
A 1940s pamphlet issued by the S.M.R.C. to advise mainly on small-bore shooting.
Most of this advice is as good today as it was then.
This pamphlet was also published with acknowledgement of the Service Rifle notes authored by Captain T.S. Smith, 1939 winner of the King's Prize at the Bisley annual Imperial Meeting, the front page being almost identical in layout*. Both booklets were printed by "Benhams" the well-known Colchester printing Company owned by Hervey Benham of Mersea Island, Essex.
It will be noted that the address given for the Society of Miniature Rifle Clubs at this time was in Richmond, Surrey.

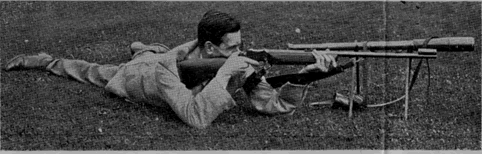
1. Prone Position and Hold.
WITH neck free of any tight collar lay the body at an angle
of about 45° to the left of the line of the rifle and the target and spread
the legs fairly well out with insteps splayed to the ground [Ed: a position
no longer wholly recommended, but still oft used, especially by ex. military
shooters]. Pass the left arm through the sling, then bring the hand under
and over the sling on to the foreend of the rifle. The fore-end of the rifle
should not be gripped tightly with the left hand ; rather relax the hold and
allow the rifle merely to " rest " in the palm of the hand not less
than two inches in front of the point of balance. Keep the sling well up under
the arm-pit and place the elbows so as to form a tripod with the chest. The
remainder of the body from the chest to the inner side of the heels should
" hug " the ground. Place the thumb and last three fingers of the
right hand firmly around the small of the rifle butt, leaving the fore-finger
free. Place the butt of the rifle against the right shoulder. The sling will
then, if it has been properly adjusted, hold the butt firmly in position,
and the shooter will be able to hold the rifle comfortably in position if
the butt is of the right length. A comfortable position on the firing point
is essential to good scoring. These instructions cover the ordinary sling
and not the loop sling, illustrated on page 5 [section 4]. The essential
points in the use of the loop sling are that the left elbow must go as far
under the rifle as comfort will allow, and the fore-end rests on the wrist
bone rather than in the palm of the hand. The loop sling must be used in conjunction
with some form of hand-slob placed just in front of the position of the left
hand, which is thrust forward against the hand-stop in the angle formed by
the sling and the foreend. The rifle can then be held steadily without any
grip of the fingers. A padded glove on this hand is desirable. The right elbow
must be fairly well out and not likely to slip. Of course, for left-handed
shooters all the above procedure is reversed. A shooting coat and elbow pads
are recommended. The former relieves tension of sling on upper arm and the
latter avoids soreness of elbows.
[Ed: it should be borne in mind that, whilst single-point slings are now generally the order of the day, for those engaging in historic rifle competition, "in the spirit of the original", then this advice is still pertinent].
2. Aiming-What you should see with the Aperture Sight.
Looking through the rear eyepiece the shooter should bring the blade foresight
to bear on the bull as in fig. 1. The same amount of white between blade and
the black must be showing for each shot. Most of the best shots use the ring
foresight (fig. 2), and when it is used the black must be seen exactly
in the centre. The right eye should be kept at the same distance from the
eyepiece of the rearsight for each shot. Let the head drop naturally in position
on the butt. Do not strain the neck and head forward or force the head back
tolook through the rearsight. If this cannot be done, either the length or
the formation of the butt is unsuitable. Avoid aiming too long, and stop and
start again if a blur comes over frontsight or bull. The ring foresight is
used almost universally for target shooting, though one standard size ring
does not suit everyone : the rearsight aperture should be as small as possible
to suit your eyesight. Beginners sometimes discard the ring foresight saying
that they can see the bull better with the blade. They have not realised that
they are using an aperture which is far too small and that they are straining
their eyes in consequence. Do not try to use too fine an element.


Mr. A. G. BANKS of Bradford demonstrates
trussed sling hold, with two-point attachment sling well up under armpit and
taut enough to hold rifle in position without muscular exertion.
Mr. H. S. Longhurst, World's Champion, 1933, shows an ideal firing position
with the two-pointattachment sling. (The fore-end handstop was not in general
use at this period.)

Mr. JOHN HALL, holder of the World's record Grand Aggregate score of 1397.3
ex 1402, demonstrates the position of the left elbow in using the single point
loop sling, i e., plumb under the rifle.
The .08" and .085" sights were correctly designed many years ago
for the old type of target and are therefore theoretically wrong for the larger
aiming mark on the modern S.M.R.C. Match cards.
The majority of experienced rifleshots favour .09" or .095", and
.10" when they have a fair amount of shooting to do at one time, especially
in a poor light, whilst some make .10" the smallest for artificial light
and use .135" for the latter, with .125" in natural light.
A good general principle is to use a ring-element with an aperture sufficiently
large to allow the bull's-eye to stand out clearly, though experimenters will
try to find a natural combination of "aperture", "width of
metal " and "white round the bull" which produces a nice balance
of all three.
Make sure that you are looking through the centre of the aperture, otherwise
there will be a blur. (The S.M.R.C. sells at 6d. each, post free, "The
Rifleman" celluloid foresight ring discs in four shades of colour, i.e.,
natural, amber, green and blue, which give improved definition, especially
outdoors.) [Ed: some of these may still lie in the round brass, knurled
screw-lid, Parker-Hale sight element holder often fixed under the woodwork of an old target rifle].
The blade or bead foresights are better for aiming at natural objects, sporting
targets, etc.
3. Aiming - What you should see with Open Sights.
Looking through the "U" of the backsight, you will see the blade
of the foresight. In aiming, do not confuse this with the protector on either
side.
This blade must be brought in to the centre of the " U " and the
tip exactly in line with the shoulders of the back sight.
Having aligned both sights in this way, bring the tip of the foresight to
a point just (and only just) touching the bottom of the aiming mark. This
aim is referred to as a 6 o'clock aim.

Let the chin drop naturally in position on to the butt.
Do not strain the neck and head forwards or force the head back.
Avoid aiming too long, and stop and start again if a blur comes over the foresight
or aiming mark.
4. Let Off-How to Press the Trigger.
With the right hand holding the rifle as in paragraph 1, place the first or
second joint or pad of the forefinger, whichever is the most comfortable and
controllable, on the trigger. When you are satisfied that the foresight is
in the correct position in relation to the target, gradually squeeze or press
the trigger until it is released and the shot fired. The small of the butt
should be held firmly, and this, together with the gradually increasing pressure
of the trigger finger, will avoid " pulls " or bad " let-offs".
When pressing the trigger, the trigger finger should be kept as rigid as possible
and the pressure should be as straight as possible to the line of the barrel,
although some prefer a slightly upward direction of pressure. It is a help
to practise "let-offs" or "snapping " with an empty cartridge
case in the chamber of the rifle, aiming and endeavouring to prevent the sights
from moving off the object when the trigger is pressed.

Mr. JOHN HALL demonstrates position (left side) using the single point loop sling.

MR. ARTHUR TRAIES, EUROPEAN CHAMPION, 1929, demonstrates position (right
side) using the single point loop sling.
The " let-off " squeeze should be a pressure between the thumb and
the trigger-finger, sufficient only to release the trigger, and the shooter
should be very careful to exercise this pressure quite independently of the
pressure exerted by the remaining three fingers against the palm of the hand
in holding the small of the butt. Finally, compel yourself to hold the rifle
motionless for a full second after the fall of the striker.
5. Breathing.
Breathing correctly has a very big bearing on the success of a shoot. The
rifleman should get into position with the rifle at his shoulder, he should
then take two or three easy breaths, and gradually exhale until some part
of the breath can be held comfortably, which condition should be made to synchronize
with the sights coming into alignment on the target. When everything is relaxed
the aim at the target should be finally corrected and the trigger pressed.
By no means must he discharge his rifle if he feels he must take another breath,
for if he does then press the trigger a bad shot will inevitably result. It
is better to take another breath, exhale as before, and try again. It would
be of great utility if a rifleman could practise breathing and aiming in the
prone position with an empty rifle, the object in view being to get the foresight
automatically in correct relationship to the bull when the time comes to still
the breath and press the trigger. This should be done in conjunction with
"snapping" practice. See para. 3.
6. How to Explain Positions of Shots when Spotting.
How to put into words the position and value of each shot. The figures round
the outside indicate the clock face positions. The vertical figures 5 to 10
show the value of the scoring rings. 
The position and value of the shots shown are as follows:-
No. 1 ........................... 5 at 9 o'clock.
No. 2 .................. Bad 6 at 10 o'clock.
No. 3 .........7 quarter on at 11 o'clock.
No. 4 ...............8 half on at 12 o'clock.
No. 5 ..... 8 three parts on at 1 o'clock.
No. 6 .... 9 all-in at half-past 4 o'clock.
No. 7 ........... All-in carton at 8 o'clock.
7. How to Read the
Vernier Scale and to Adjust the Aperture Rearsight.
After proficiency has been acquired in the practice of grouping shots within
a reasonable circle according to the range used, the next step is to adjust
the rearsight correctly both laterally and vertically to bring the next groups
shot into the centre of the target. The effect of elevating the rearsight
aperture is to depress the butt of the rifle at the shoulder, which has the
same effect as raising the muzzle end and thus causes a shot to go higher.
Similarly moving the rearsight to the right moves the butt in the opposite
direction and the shot goes more to the right than the previous one ; and
vice versa for lower or left shots respectively. To raise the rearsight turn
the milled screw on the top to the right or clockwise. To lower turn to the
left or anti-clockwise. To move the sight to the right turn the screw on the
side to the right or clockwise. To move to the left turn it to the left or
anti-clockwise. Small movements may easily be read off by counting the clicks,
but every user of this sight should know how to read the Vernier (Fig. 4).
It must be borne in mind that the spaces on the Vernier do not represent range
distances, but only movements of the sight on the target.
[Ed: N.B. all BSA Rifles, and most equivalents contemporary to this era - up to the Martini International rifles of the 1970s - had sight adjusting threads of this hand. Anschutz and many other later target rifles, from the 1960s on, were fitted with opposite-hand windage and elevation spindle threads, requiring anti-clockwise rotation for upward elevation and left windage adjustment respectively]
To work adjustments by sight the sliding Vernier scale is adapted to split
up each division on the stem into fifths, and as there are four clicks to
each fifth there are 20 clicks to a division, each division being 1/20th of
an inch.

Fig.4
To move the sight from zero (No. 0) one-fifth of a division - i.e. an adjustment
of 1/100th of an inch (four clicks) - turn the elevating screw until the second
line on the Vernier coincides with the second line on the stem (No. 1), for
two-fifths or 2/100ths (eight clicks) make the third lines coincide
(No. 2), for three (twelve clicks) the fourth lines (No. 3), for four (sixteen
clicks) the fifth lines (No. 4), and for five-fifths or one complete division
(twenty clicks) the zero line on the Vernier should be brought opposite the
first short line above the zero line on the stem (No. 5). When you have found
the correct adjustment of your rearsight, make a note of the readings on the
elevation and lateral (windgauge) scales. If some other member of the club
moves the sights, you are then able at once to re-set them to your readings
instead of wasting ammunition sighting up.
(Fig. 5) shows approximately a 25 yards target divided into squares, each
square represents of movement on the backsight. Supposing your shots are all
grouped at 1 o'clock, as shown in the figure, the adjustment required will
be 1½ minutes or degrees (i.e., 6 clicks) left on the windgauge scale
and 3½ minutes (i.e., 14 clicks) down on the elevation scale, which
will bring your next shots into the bull. In practice the Vernier scale is
ignored and the rearsight is adjusted by " Feel " or " Sound
" of the 4 clicks on the elevation and windgauge screws. An alteration
of four clicks (or one minute) will alter the position of your group approximately
1" at 100 yards (1.04.", to be exact), ½" at 50 yards,
and ¼" at 25 yards. In other words, 4 clicks will bridge the distance
between two adjacent scoring rings and 6 clicks will move the shots from the
edge of one scoring ring to the centre of the next two. For example, a shot
on the nine ring at 3 o'clock can be brought into the carton by turning the
side screw of the Vernier backward 6 clicks, and similarly a shot on the 8
ring at 6 o'clock can be brought into the 10 ring (carton) by turning the
elevation screw 10 clicks forward (i.e., to the right). Rearsights will soon
be fitted with the finer adjustment of eight clicks to 1/100th of an inch,
in which case, of course, all the abovementioned movements will be doubled
in number.
See also: the Full-bore Vernier Scale
8. The Back Sight of the Service Rifle (S.M.L.E.).
By pressing the thumb piece on the left hand side of the slide, it can be
moved up and down the leaf. Notches are provided on the right hand side of
the leaf so that the slide may be fixed in any position required. A fine adjustment
screw is provided on the right hand side of the slide.
For use with .303 Service Ammunition, the distances are clearly marked on
the scale. For Small-Bore shooting at short ranges, the
.22 S.M.L.E. does not of course shoot to the ranges marked for the .303.
At 25 yards the sight setting is generally at about the 400 yards mark.
A wind gauge is provided at the end of the leaf and by turning the milled
screw towards you (or anti-clockwise) the " U " on the back sight
will move across to the right. This will cause the barrel (when aim is taken)
to point to the right of the aiming mark and so put the shots to the right.
Conversely, when the milled screw is turned away from you (or clockwise) the
shots will go to the left. Each click gives one minute of angle, or 4 in.
on target at 25 yards.
See illustration on title-page.
9. The Essence of All Shooting.
Remember that no rifle yet made will put all its shots through the same hole.
A rifle is somewhat like a hose pipe, and all its shots will spread and strike
the target in what is known as a pattern or group.
Just as water from a hose pipe will spread, according to the size of the nozzle,
so a rifle barrel will spread its bullets.
According to the quality of the barrel and the way that the rifle is made
and tuned up so the group of shots will be large or small. A good standard
is a 2 in. circle at 100 yards. [Ed: the modern 100 yard
Bull's-Eye is approximately 1 inch in diameter, but a 2" group would
still be a "good standard". Tightening of groups over the years
has had more to do with improvements in .22 rimfire ammunition than any other
individual factor ].
The object of all shooting is to try and place the centre of the group in
the centre of the °` Bull's Eye," by adjustment of the sights provided.
To Describe Wind Direction.
On the open-air range, for the purpose of describing wind direction, the range
is regarded as a clock face lying on its back, the 12 o'clock figure being
at the butts and the 6 o'clock figure at the firing point. Therefore a 9 o'clock
wind would be from the left, and a 3 o'clock wind from the right, and so on.
Benham & Co. Ltd., Printers, Colchester, Essex.
Below is an image of the front page of the alternative pamphlet showing the acknowledgement of Cat. Smith's Service Rifle notes. The publication was now "by kind permission of" the Society of Miniature Rifle Clubs, and the "collaboration" was " with leading Small-Bore Marksmen" rather than simply with "leading Marksmen".

Te retailer's stamp indicates that his copy was distributed via Alfred J. Parker, then at Bath Street, Birmingham.
Return to: TOP of PAGE
See this website's Raison d'être