
Please be aware that some specialist imagery may take time to load.
This site is designed for dedicated researchers on desktop or tablet, not ideal for mobile browsing.
AIMING REST.....ENFIELD REST....BALL REST......LeGRET DEVICE.....AIMING DISCS.... AIM CORRECTORS.... McQUEEN TEACHER.... PAIGE TRAINER.... JEFERY VIEWER
See also: the Flashspotter Rifle and Spotlight Projector
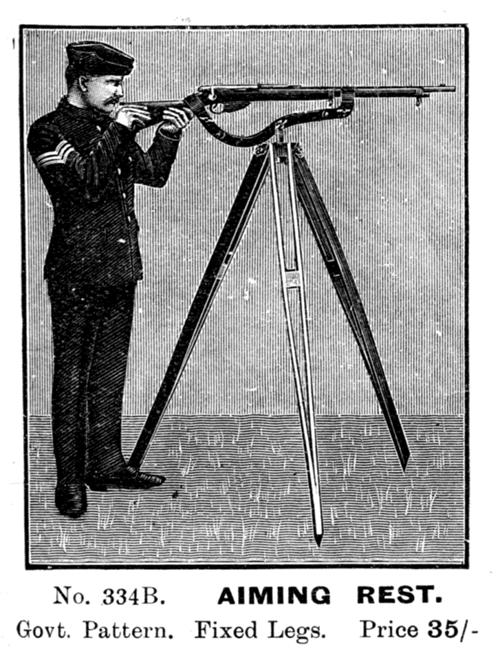
We commence the page with an engraving from the 1925 catalogue of A.G. Parker & Co. Ltd.
It is of a traditional Aiming Rest for aiming instruction. The diagram to the right shows another design specifically produced for the S.M.L.E. rifle.


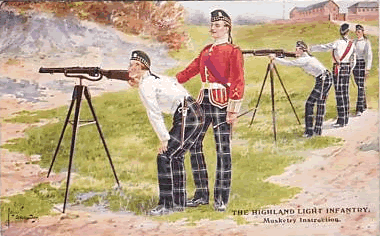
See also the "Enfield Rest"
The Enfield Rifle Rest is not to be confused with the aiming rest.
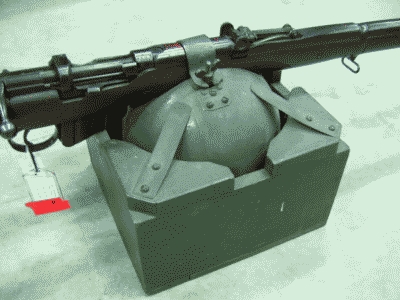 Alongside:
we complete the aiming
rest section with a representation
of the rarely seen
ball-rest for the S.M.L.E. rifle -
This example is held in
the M.O.D. Pattern Room.
This device is here shown to the left as recorded in the 1910 Musketry Regulations - 1914
Image (above right) by courtesy of the Enfield Pattern Room - now at the Leeds Royal Armouries
Whilst this is not a training device, it is technically an aiming rest 'of sorts', and we ought perhaps to mention this famous device made for the Enfield rifle, more usually known as the "Enfield Rest". This cast iron factory testing bed is shown below.

Image by courtesy of Bonhams - Knightsbridge
The example above was sold at auction in 1997 at Bonhams in London. Those good few years ago, without the L42A1 rifle, but with its associated sighting 'layer's telescope' in the box in the foreground, the 'Enfield Rifle Rest' commanded a sum of nearly £3000.
The rest was capable of use with the S.M.L.E., No.3 and latterly No.4 pattern rifles. It was " designed to hold a rifle in approximately the same manner as regards points of support, recoil, etc., as it would be held by a firer. Means are provided for laying the aim correctly by the manipulation of hand wheels. They [the rests] were installed in all the British Ordnance Factories where rifles were manufactured". A modified Enfield Rest was used to fire test groups with the No.8 Rifle to ensure it met the specified Point of Impact figures.
The telescopic sighting laying instrument was "for laying an aim when accuracy testing Lee-Enfield Rifles from the Enfield Rest. It is a telescopic sight mounted on a bar; the front end of the bar is grooved to fit over the foresight, and the rear end has an adjustment for fitting the "U" of the backsight. Special fittings are required for using this instrument with the No.4 Rifle because of its different [rear aperture] sighting arrangement"*
The Enfield Rest below is an earlier version, currently residing in the collection of the Small Arms School at Warminster.
It holds a Pattern 1853 Enfield percussion service rifle.
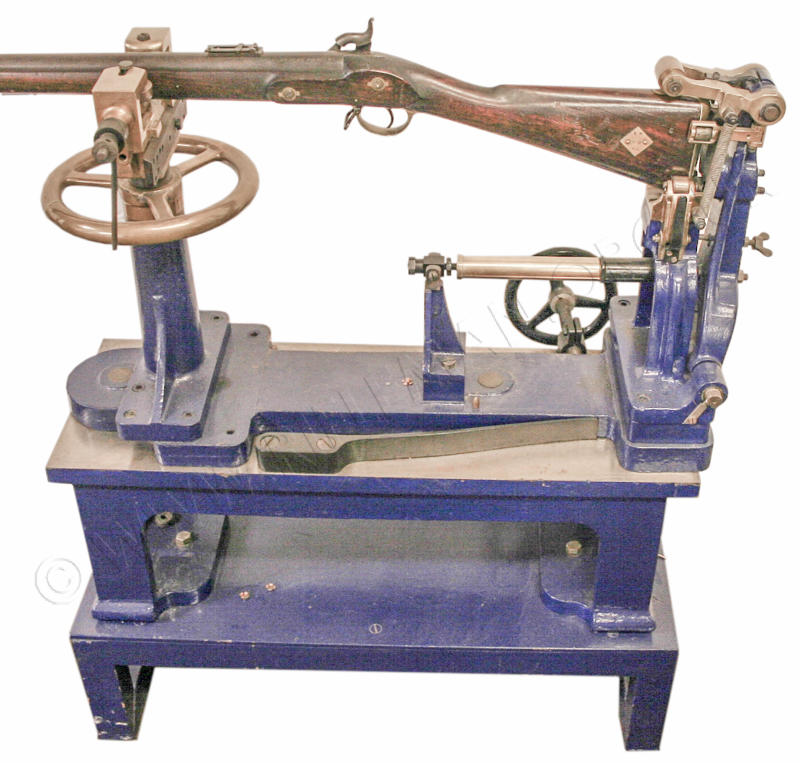
Images above and below by courtesy of the Small Arms School Collection - Warminster
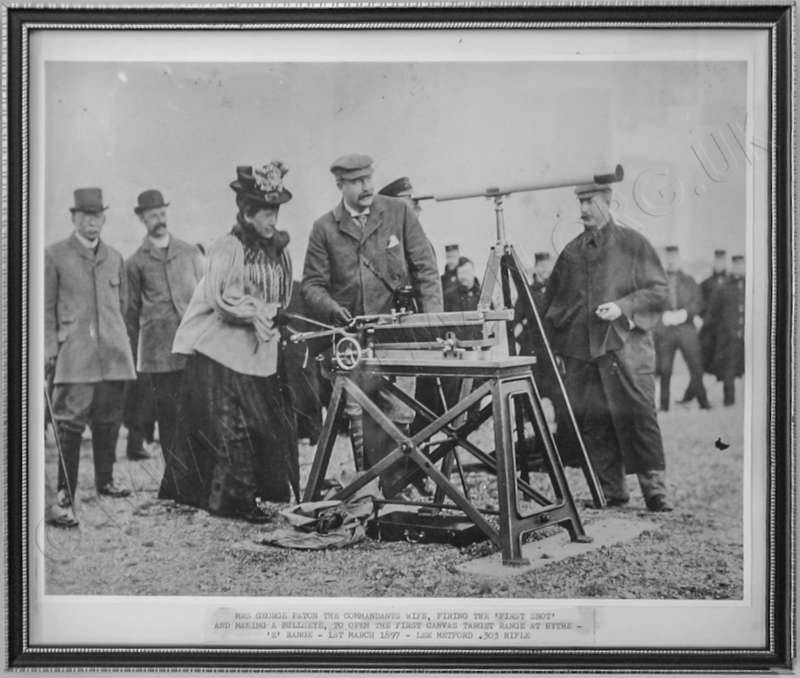
Dated between the two above illustrated Enfield Rests, this photograph is captioned
"Mrs George Paton the Commandant's wife, firing the 'First Shot'
and making a bullseye, to open the first canvas target range at Hythe -
E-Range - 1st. March 1897 - Lee Metford .303 rifle"
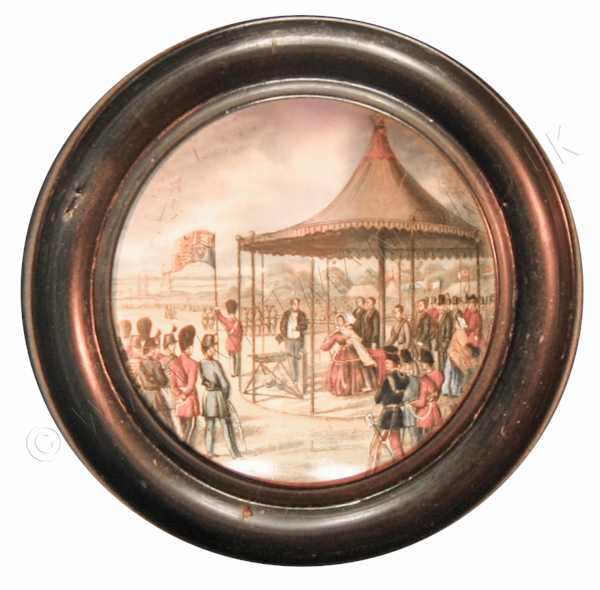
This was not the earliest "Bench Rest" shot, as the more famous image of Queen Victoria opening the
National Rifle Association's new ranges at Wimbledon in 1860
precedes this by seventeen years.
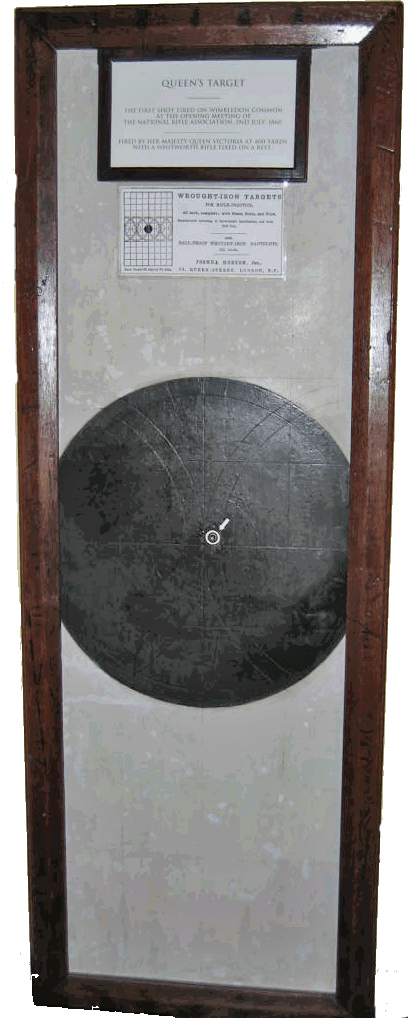
The cast iron target, at which Quuen Victoria's first shot at Wimbledon was fired,
resides in the N.R.A. Museum at Bisley Camp, Surrey ( U.K.)
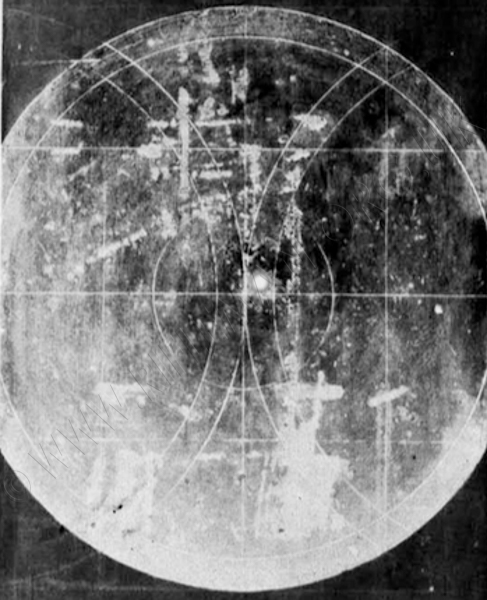
A close-up image showing the Whitworth bullet strike.
A newspaper reporting on the National Rifle Association of the U.S.A.
carried the following engraving contemporary to the opening
of the British NRA Wimbledon ranges by Queen Victoria,

The London Illustrated News of July 1860 published a map of the Wimbledon Camp
showing the positions of the ranges, pavilions and the tent from which
Queen Victoria fired that famous first shot from the specially constructed aiming rest.
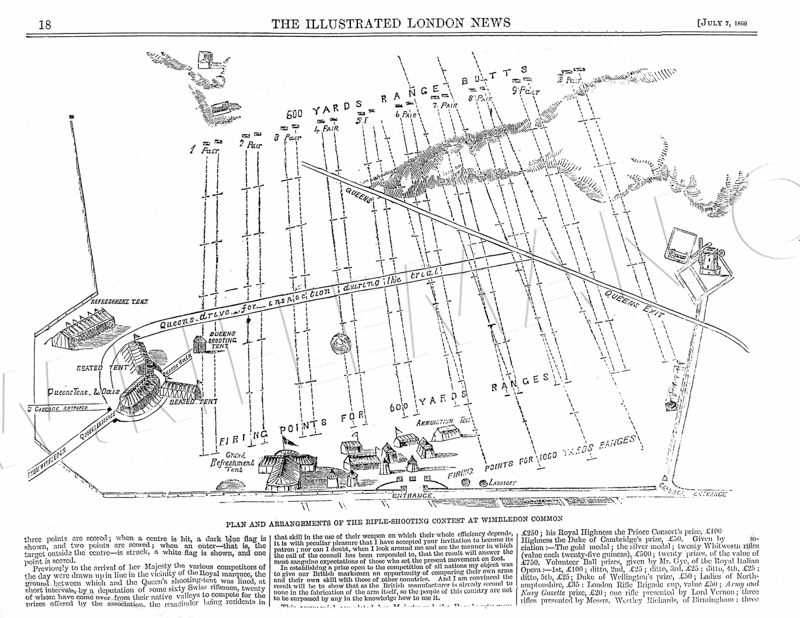
In 1874, Wimbledon saw the introduction of the butts gallery canvas targetry system.
The current Bisley ranges galleries are little changed in design.

* "The Lee-Enfield Rifle" by E.G.B. Reynolds - see Bibliography
A more common aim-teaching device - The Aim Corrector
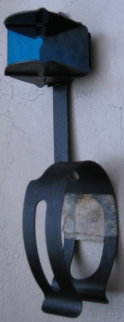
Below: the earliest reflective glass "Aim Corrector, Mark I" adopted in LoC* 6628, 3rd. November 1891

Below: probably the most familiar aim corrector; that for the Rifle, Short, Magazine, Lee-Enfield (S.M.L.E.)
 .........
A page of instruction on the unit above, from a 1915 Manual
of Musketry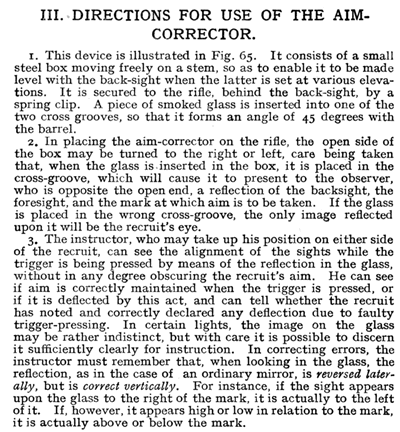
III. DIRECTIONS FOR USE OF THE AIM CORRECTOR.
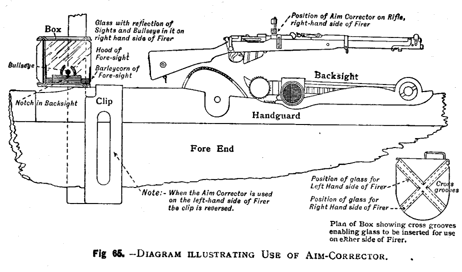
1 . This device is illustrated in Fig. 65. It consists of a small steel
box moving freely on a stem, so as to enable it to be made level with the
back-sight when the latter is set at various elevations. It is secured to
the rifle, behind the back-sight, by a spring clip. A piece of smoked glass
is inserted into one of the two cross grooves, so that it forms an angle
of 45 degrees with the barrel.
2. In placing the aim-corrector on the rifle, the open side of the box may
be turned to the right or left, care being taken that, when the glass is
inserted in the box, it is placed in the cross-groove, which will cause
it to present to the observer, who is opposite the open end, a reflection
of the backsight, the foresight, and the mark at which aim is to be taken.
If the glass is placed in the wrong cross-groove, the only image reflected
upon it will be the recruit's eye.
3. The instructor, who may take up his position on either side of the recruit,
can see the alignment of the sights while the trigger is being pressed by
means of the reflection in the glass, without in any degree obscuring the
recruit's aim. He can see if aim is correctly maintained when the trigger
is pressed, or if it is deflected by this act, and can tell whether the
recruit has noted and correctly declared any deflection due to faulty trigger-pressing.
In certain lights, the image on the glass may be rather indistinct, but
with care it is possible to discern it sufficiently clearly for instruction.
In correcting errors, the instructor must remember that, when looking in
the glass, the reflection, as in the case of an ordinary mirror, is reversed
laterally, but is correct vertically. For instance, if the sight appears
upon the glass to the right of the mark, it is actually to the left of it.
If, however, it appears high or low in relation to the mark, it is actually
above or below the mark.
.
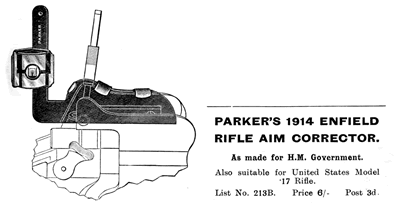
Below is shown an equivalent version for the Lee-Enfield rifle No.3 ( Pattern '14)
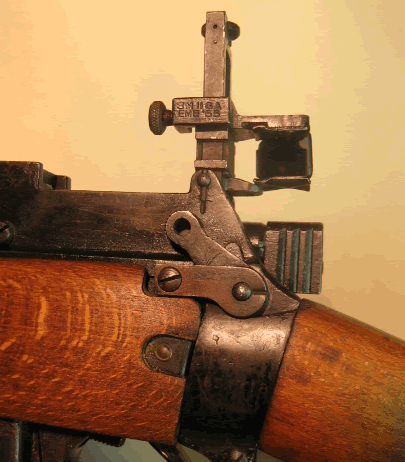
and below, the equivalent equipment for the Lee-Enfield No.4 Rifle
A rarely seen civilian small-bore shooters' device was also available in the 1960s from the N.S.R.A.
Called the " Jefrey Viewer ", it was marketed whilst the Association was incumbent at
"Codrington House, 113, Southwark Street, London, S.E.1" after 1953.
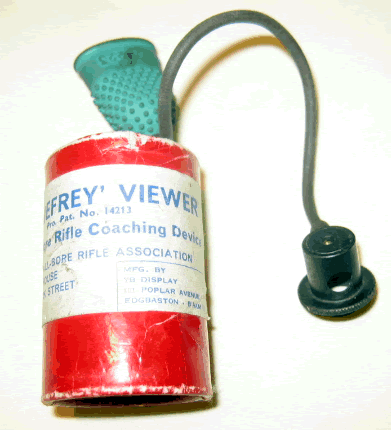
The device fitted into a Parker-Hale
type rearsight eyepiece , such as the six-hole model shown below, and
replaced the eye-cup.
In normal use, both the shooter and instructor could see the sight picture, but a hinged internal mirror could be moved almost instantaneously, closing down the sight-picture of the shooter - whilst the instructor could still enjoy the view. This was achieved by dint of an ingenious but simple activation method. The mirror was moved by a tiny air-valve, itself operated via a small rubber tube of about six inches in length and terminating in a rubber thimble. The thimble was put on the end of the instructor's finger, but not pulled right down, leaving a pocket of air above the finger-tip. Another finger or thumb pressed on the end of the thimble and, hey presto, the trapped air passed up the pipe and changed the position of the mirror at a stroke. If you have ever seen one of these in use, do let us know; we've not seen other than our 'museum' example, and are obviously not old enough to have viewed one in contemporary action. Another fine example of British ingenuity - we believe - unless you know better.
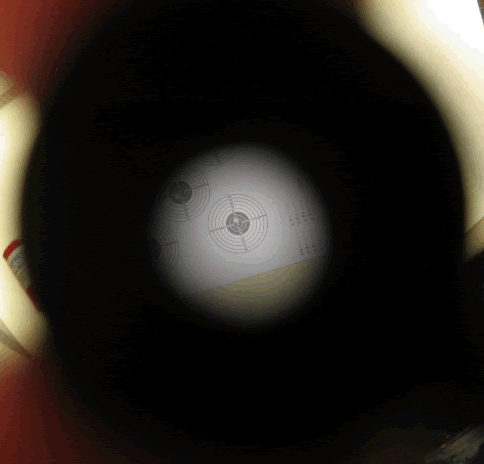
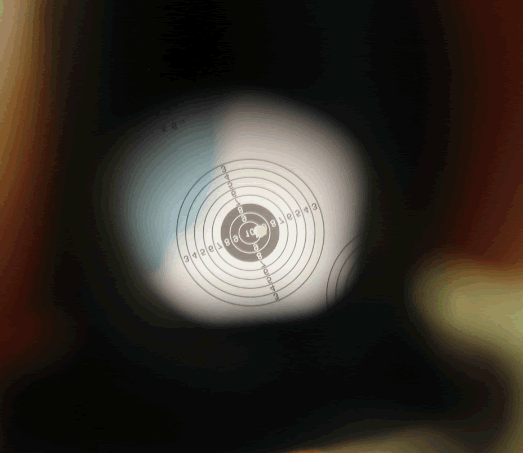
The shooter's view is shown left, and the instructor's right.
A far clearer picture was available than to the users of the old refractive aim-corrector.
Obviously there is no fore-sight shown in these mocked-up images.
Below: The A.G. Parker marketed " LeGret Aim Teacher"
adopted as the "Aim Teacher, Mark I" in LoC 15525, 20th. April 1911
The unit's use was included in Musketry instruction manuals or the First World War (1914-18)

and an advertisement for same also in their 1925 catalogue
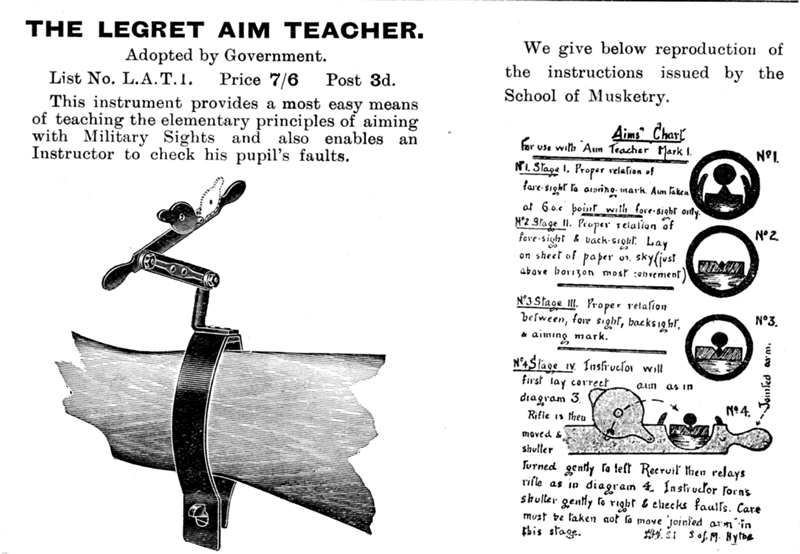
Below are images of the pages of a contemporary manual detailing rifle instruction, and specifically illustrating the use both of the LeGret aim-teacher and the Reflective Aim-Corrector. For clarity, the text has been repeated to the right of each page.
 SIGHTS
AND AIMING
The recruit should understood that the foresight gives direction, and the
backsight elevation.
This will be demonstrated by aligning the foresight upon a definite object
(ignoring the backsight for the time being), after which it will be explained
that, although the trajectory of the bullet carries it a considerable distance
without any appreciable toil, yet the laws of gravitation assert themselves
later, and it is to compensate for this fall that the backsight is used.
The effect of the backsight can be shown by placing the rifle in a rest,
remove the bolt, align the sights with a definite mark, look through the
bore of the rifle, when the amount of elevation will at once be appreciated.
Considerable practice should be devoted to the rapid adjustment of sights.
With the short rifle the thumb of the left hand should be used for operating
the locking spring. It is quite simple, and easily adjusted, and, with practice,
a high state of proficiency can soon be attained. The M.L.E. is somewhat
more awkward, owing to the fact that there is a locking nut to be unfastened
and fasstened for each adjustment. Constant practice, however, will soon
enable the recruit to adjust it rapidly and accurately.
Before proceeding with the various instructional tests, the following rules
will be explained and demonstrated to the recruit :
(a) The backsight must be upright.
(b) The top of the foresight must be in centre of and in line with the shoulders
of the "U" or "V" of the backsight.
(c) Aim should always be taken at the centre of the lowest part of the object
(i.e., six o'clock aim), the great
advantage in this being that the whole aiming mark is kept in view.
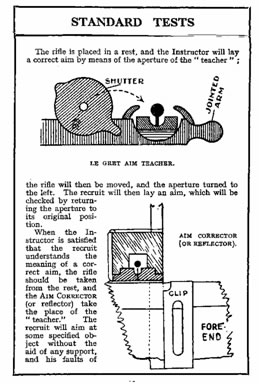
STANDARD TESTS
The rifle is placed in a rest, and the Instructor will lay a correct aim
by means of the aperture of the " LeGret aim teacher " ; the rifle
will then be moved, and the aperture turned to the left. The recruit will
then lay an aim, which will be checked by returninig the aperture to its
original position.
When the Instructor is satisfied that the recruit understands the meaning
of a correct aim, the rifle should be taken from the rest, and the Aim Corrector
(or reflector) take the place of the "teacher."
The recruit will aim, at a specified object, without the aid of any support, and his faults of................
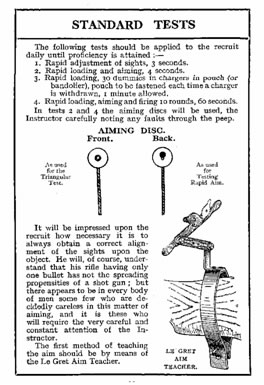
STANDARD TESTS
The following tests should be applied to the recruit daily until proficiency
is attained :
1. Rapid adjustment of sights, 3 seconds.
2.. Rapid loading and aiming, 4 seconds.
3. Rapid loading, 30 dummies
in chargers in pouch (or
bandolier), pouch to be fastened each time a charger is withdrawn, 1 minute
allowed.
4. Rapid loading, aiming and firing 10 rounds, 60 seconds.
In tests 2 and 4 the aiming
discs will be used, the Instructor carefully noting any faults through
the peep.
It will be impressed upon the recruit how necessary it is to always obtain
a correct alignment of the sights upon the object. He will, of course, understand
that his rifle having only one bullet has not the spreading propensities
of a shot gun; but there appears to be in every body of men a few who are
decidedly careless in this matter of aiming, and it is these who will require
the very careful and constant attention of the Instructor.
The first method of teaching the aim should be by means of the Le Gret Aim Teacher.
..................................................................TRIGGER PRESSING .......................
..............................................................
the lower part of the trigger.
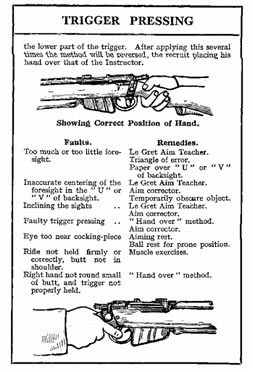 After applying this several times the method
will be reversed, the recruit placing his
hand over that of the Instructor.
............Faults. .....................................................................................Remedies.
Too much or too little
fore-sight....................................................Le
Gret Aim Teacher.
........................................................................................................ Triangle of Error.
..........................................................................................................Paper
over " U" or " V" of backsight.
Inaccurate centering of the ..........................................................Le
Gret Aim Teacher.
...................................................................................................or
Aim Corrector.
foresight in line with the "U" or" V" of backsight. ........................................Temporarily
obscure object.
Inclining the sights ..................................................................... Le Gret Aim Teacher.
.........................................................................................................Aim
corrector.
Faulty trigger pressing................................................................."Hand
over" method.
.......................................................................................................Aim
-corrector.
Eye too near cocking-piece .........................................................Aiming
rest.
......................................................................................................Ball
rest for prone position.
Rifle not held firmly or.correctly, butt not in shoulder....................... Muscle exercises
........................................................................................................ "
Hand over " method.
.............................................Right hand not round small of butt, and trigger not
properly held...................................................
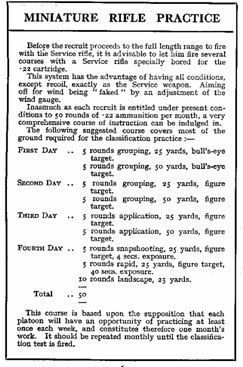 MINIATURE RIFLE PRACTICE
Before the recruit proceeds to the full-length range to fire with the Service
rifle, it is advisable to let him fire several courses with a Service rifle
specially bored for the .22 cartridge.
The system has the advantage of having all conditions, except recoil, exactly
as the Service weapon. Aiming off for wind being faked" by an adjustment
of the wind gauge.
Inasmuch as each recruit is entitled under present conditions to 50 rounds
of .22 ammunition per month, a very comprehensive course of instruction
can be indulged in.
The following suggested course covers most of the ground required for the
classification practice :
First Day .. 5 rounds grouping, 25 yards, bull's-eye target.
....................5 encode grouping, 50 yards,
bull's-eye target.
Second Day .. 5 rounds grouping, 25 yards, figure target.
........................5 rounds grouping,
50 yards, figure target.
Third Day .. 5 rounds application, 25 yards, figure target.
.....................5 rounds application,
50 yards, figure target.
Fourth Day .. 5 rounds snapshooting, 25 yards, figure target, 4 secs. exposure.
........................5
rounds rapid, 25 yards, figure target, 40 secs. exposure.
........................10
rounds landscape, 25 yards.
Total .............. 50 [rounds]
This course is based upon the supposition that each platoon will have an
opportunity of practicing at least once each week, and constitutes therefore
one month's work. It should be repeated monthly until the classification
test is fired.
 RIFLE
PRACTICE
Where the Solano apparatus is
available much more interesting and instructive work can be a arranged but
at the present time there are so many units which have not these facilities,
that those suggestions apply mainly to them.
A small magazine can be obtained from Messrs. A. G. Parker & Co., Birmingham, For rapid fire practice with .22 ammunition.
[see the Hiscock Parker magazine]
For "Landscape Targets" and
"Fire Orders," see page 32
Service Rifle Practice.
Constant practice and careful tuition on the miniature rifle range should
have removed practically all the faults the recruit is susceptible to, therefore
his appearance on the open range should be productive of most satisfactory
results, more especially if the value of "snapping" practice has
been impressed upon him.
It should be only necessary to remind him that many of our foremost shots keep themselves in form, not by constant attendance on the range and consequent expenditure of ammunition, but by "snapping" daily at some little aiming mark placed some few feet from the muzzle of the rifle. Correct position must be assumed, and special care in trigger pressing, watching that the sight is in line with the object before and after the trigger has been released the recruit can bring himself to this state of proficiency, he need have little fear as to the result of his first visit to the range with his Service rifle.
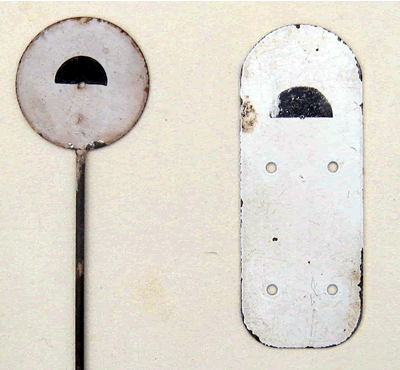
Aiming discs of various designs were in common use for musketry instruction over many years

IV. DIRECTIONS FOR USE OF THE AIMING-DISC.
The aiming-disc is a small rod, bearing a
disc of metal or cardboard, painted white, about 1½ inches in diameter
(Fig. 66). On the front is a black bull's-eye ½ inch in diameter,
in the centre of which is pierced a hole just large enough to admit the
point of a pencil. On the back is a bull's-eye, also ½ inch in diameter,
placed so that the six o'clock line is just above the hole which is in the
centre of the bull's-eye on the front.
The instructor may ascertain the accuracy of the recruit's aim and his power
to press the trigger without disturbing aim by the use of the aiming-disc
in the following manner:
He should take up his position
in front of the recruit at a distance of about 4 or 5 feet from the muzzle
of his rifle when held to the shoulder for firing in the lying position,
with his eye to the hole in front of the disc (Fig. rag). The recruit is
then instructed to bring the rifle to his Shoulder for aiming, to aim and
press the trigger at the aiming-mark at the back of the disc.
Through the aperture at the bottom of the bull's-eye at which the recruit
takes aim and snaps, the instructor is able to see the recruit's faults
of aim, and to note whether his aim is disturbed when the trigger is pressed.

The instructor is also enabled to note the rapidity with which he takes aim and presses the trigger. -This practice is useful to develop in ' men the power of aiming rapidly and correctly, which is essential for snap-shooting and rapid firing, without the danger of their contracting bad or careless habits through hurried movements.
 Several
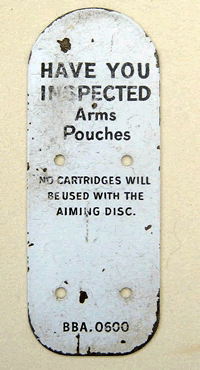
examples of aiming discs (and a plate) are show left and below.
To date, the only reference seen to safety is the reminder on the back (the face held in front of the instructor's eye) that ammunition pouches should be inspected because no cartridges are to be used with the Aiming disc!
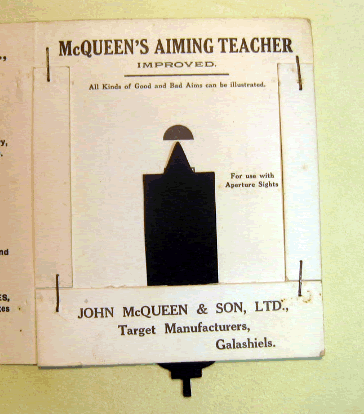
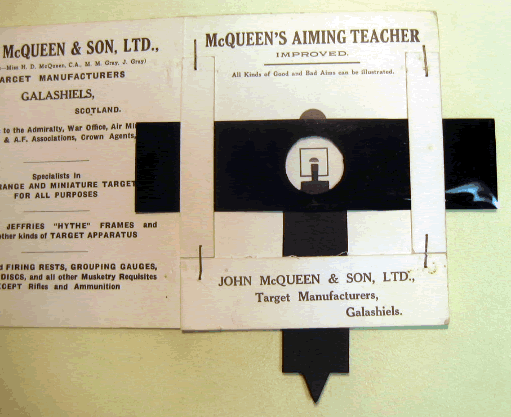
Our penultimate contribution to this collection of sundry devices is a simple desk-use tutoring item; no rifle required. It was produced by the famous McQueens Company of Galashiels, designers and printers of British targetry since time immemorial. It should suffice to only illustrate this natty little product, which put into tangible practice everything offered by the text and diagrams printed in many a shooting manual, civilian or military.
 The card carried two Tin-Hat target representations, the upper intended
for use with a
barleycorn or square-post fore-sight blade over 'open-sights', and the lower for use
with aperture sights - emulated by a celluloid slide which could be moved over the
target in juxtaposition with the fore-sight blade.
The last, and unusual, little device illustrated is a (comparatively) more recent American invention by
the PAIGE TRAINING AIDS Co. of 28, Wes 44th. Street, New York City, 18.
It is here shown attached to a Pattern '14 Enfield Rifle
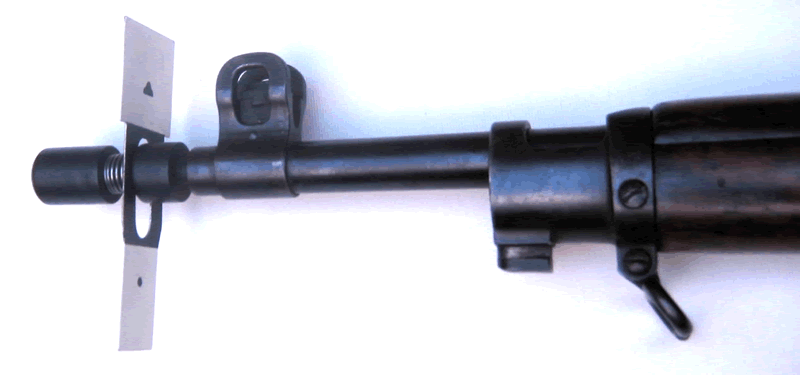
Below left: the sight picture; excluding the rear-sight aperture.
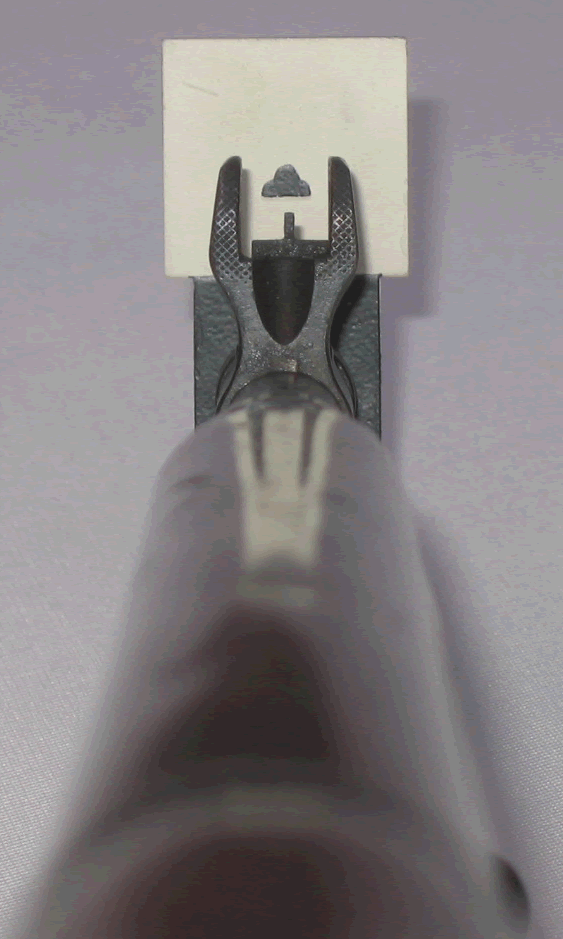
Mainly intended for use with the various
30.06 calibre U.S. service rifles, the muzzle-plug
component has stepped diameters to
permit its use both in a .22 rifle and a 30.06.
The .303"CF bore of a Pattern '14 U.S. manufactured
Enfield Rifle (the British Rifle No. 3) takes the device
up to the hilt.
The design offers a simplicity and practicality
that borders on naive,
which is not to say that there
is no value in its employment.
There is a place for almost all equipment of this type.
The instructions issued with the kit,
which comprises of a box containing
a half-dozen of the
muzzle-plug/target card combination units,
are reproduced below,
and are self explanatory.
THE INSTRUCTIONS
The use of the
INSTRUCTIONAL SIGHTING DEVICE
Coach and Pupil Method
The Instructional Sighting Device is a means of Teaching the correct Sight
Picture to a pupil upon his own rifle.
It allows the pupil to learn sighting with actual rifle sights and to demonstrate
what he has learned to his instructor.
The Instructional Sighting Device enables the instructor to check his pupil's
aim for accuracy.
The smaller taper of the Device will wedge firmly into the bore of any .22
calibre rifle; the larger taper into any .30 calibre rifle. The soft wood
of the taper cannot harm the rifle.

DIRECTIONS TO THE COACH:
Have the pupil assemble the device according to the directions printed on the back page of this booklet.
Adjust the end cap so that there is a slight pressure on the target piece.
Move target piece up or down, left or right, as the pupil requests, until pupil has front and rear sights aligned with the bullseye. If cap is in proper adjustment the target piece will hold the proper position.
DO NOT PUSH THE CAP IN after the pupil approves the final adjustment as this would change the targets position.
After the pupl approves position of target, take the rifle and check it for correct sight picture.

During sighting practice, the pupil should be checked for correct position
in holding his rifle. Small end of target piece represents a slow-fire target;
large end represents a rapid-fire target.
DIRECTIONS TO THE PUPIL:
 1. Insert
the tapered end of the spindle firmly into the rifle barrel.
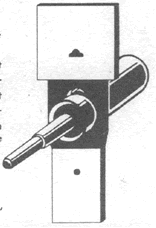
2. Remove the cap from the end of the spindle and insert that end thru the
slot in the target piece, then replace the cap
3. Adjust the pressure of the cap on the target piece so that it moves easily
but holds firmly wherever you position it
4. Place the rifle to your shoulder in aiming position. Align the rear sight
and the front sight with the bullseye on the target piece. The correct Sight
Picture should look like the illustration on the left. Ask your coach to
move the target up or down, left or right, until the bullseye is in correct
position.
5. When you hove the Sight Picture shown in the illustration ask your coach
to check it for accuracy.
PAIGE TRAINING AIDS
See also: the Flashspotter Rifle and Spotlight Projector
Click here to access a Chronology of Enfield genre Training Rifles, Adapters & Cartridges
*The "List of Changes" recorded the adoption, modification and rendition out of service of all military materiél, including most small arms and ancillary items.
Return to: TOP of PAGE
See this website's Raison d'être