Please be aware that some specialist imagery may take time to load.
This site is designed for dedicated researchers on desktop or tablet, not ideal for mobile browsing.
and its ASSEMBLY NOTES
See also the: WILKINSON SUB-TARGET MACHINE ...~.: S.M.L.E. SUB-TARGET DEVICE .~: HOLLIFIELD "DOTTER" .~.. CUMMINGS "DOT" RIFLE ~... PRACTICE RODS
This device was kindly loaned by Richard Wain (an H.B.S.A. & L.E.R.A. member) and is owned by his daughter Suzanne who lives in the U.S.A.
Although not exactly part of our remit, this sub-target device is most unusual and should be directly compared with the British sub-target device designed to be attached to the Magazine Lee-Enfield and S.M.L.E. rifles.
Firstly, the famous 1896 rifle to which the device attaches

The Swedish Mauser has been in service, of one type or another, for an extremely long period. It is only a few short years since rifles were sold out of service. It is therefore not a simple matter to date the sub-target equipment here shown, but it is believed to be of World War II (1939-45) vintage. Should you hold any information in this regard, we would be most grateful to hear from you. Please contact us.
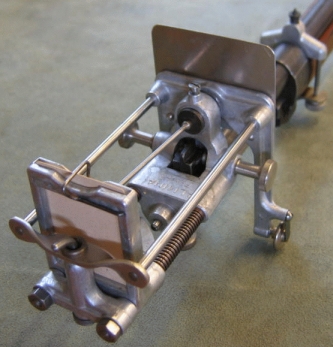
An intricate and fairly delicate design, this apparatus could well have been produced in Switzerland, such is the quality of manufacture! In use, once properly assembled, the sensitivity is astounding. There is no doubt that, apart from the absence of recoil, the equipment would have been of significant advantage in economically training recruits in holding, aiming and trigger let-off. The main problem would probably have been in protecting such a delicate unit from damage inflicted by the occasional burly and unsympathetic conscript!
It is not known whether this equipment received full military approval, although its effectiveness would suggest this to have been likely. If you have any knowledge of this, please contact us ( email the editor)
Below: the equipment laid out prior to assembly.


.................................... .............................
See ASSEMBLY NOTES compiled by Dave Clark
Once clamped to the rifle, the sub-target unit needs the "firing" mechanism to be put in place. This mechanism is about as basic as it could be. Effectively, an operating rod is fitted into the barrel. The rod has a threaded brass end which fits into the rifle's chamber at the rear and threaded adjustment section at the muzzle. In fact, to permit the components to fit into a reasonably sized box designed around the main unit, the rod is divided into sections, each with a bore diameter brass boss at each end. These slide - one after another - into the bore, and any free play is taken up by adjusting the front thread once the bolt has been replaced in the rifle and closed.
The muzzle end of the operating rod bears on a spring-loaded cam mounted under the sub-target unit frame. The whole forward section of the frame is supported on two coil-spring loaded sliding rods. This permits the small fore and aft movement necessary for the pin to perforate the target and return to its waiting position. This movement is less than a quarter-inch. When the trigger is pulled, the rifle's firing pin strikes the brass end of the operating rod and drives the rod forward momentarily. The cam is struck by the front end of the rod, and the target frame moves smartly rearwards pushing the target onto the pointer. The pointer itself remains static.
The target returns to its original position on its return springs and, after again actioning the bolt and re-cocking the rifle, it is again ready for the next shot. Even rapid fire could be practiced, and several "shots", the intention appears to be five, could be fired to effect a group by which the students performance could be accurately assessed. Altogether a most satisfactory design suffering only from a possible susceptibility to damage in protracted or careless use. Please also view the page detailing the British "Swift Training Rifle and the Canadian "Long Branch Training Rifle" of 1943 vintage.


We should, at this point, confess that, in the absence of any instructions, it took a team of three nearly ninety minutes to assemble this unit to the point where it could be correctly operated without damage to any of the delicate components. A practiced hand ought, we believe, to be able to put the set-up together in about five minutes, with a further five minutes allotted to calibration.
See ASSEMBLY NOTES compiled by Dave Clark


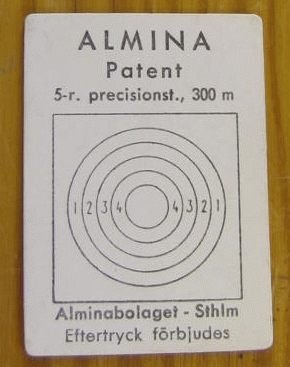
The "300 metre" sub-target on which the hits are recorded by the striking pointer
Its dimensions are approximately one-and-a-half inches wide by two inches in height; the bull's-eye is therefore of the order of a quarter-inch in diameter.
( mixing our units of measurement, the cardboard target is actually 47 x 34 mm overall with a 26 mm square target and a 6 mm bull.)

Below: the representative target upon which the person in training is required to take aim
The aiming target boards are 4.5 mm square with a 2 mm bull.

Below is the device fitted with its calibration plate. The rear of the plate drops into the target holding frame and the front section, with an inverted "V" cut-out, overhangs the point of the striking pin, as shown. The knurled knobs either side of the aiming mark landscape target can be adjusted to bring the sights of the rifle to the correct windage. The elevation adjustment is made by raising or lowering the foresight barleycorn, which is threaded into the separate clamping device which permits the alternate fore-sight to be affixed to the fore-end of the rifle ( see images above). It will be seen that the Mauser rifle's own foresight cannot be used since the whole sub-target unit clamps to the rifle around the fore-sight and its mounting block.

Below: it may not be coincidence that the equipment's box, when placed on end, is the perfect height on which to rest the rollers supporting the sub-target unit. As soon as the rollers touch a table top, for instance, the target striker pin becomes unweighted and hovers menacingly over the target less than an eighth of an inch away. A really steady hold is required to keep the needle remotely within the diameter of the bull's-eye. This is no toy! It will really sort the men from the boys!

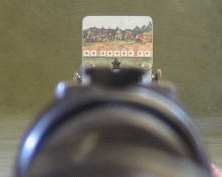
Below: the sight picture as seen by the "shooter". The fore-sight is here high in the rear-sight "V" notch, partly to best illustrate the equipment and show how the unit's special fore-sight can be screwed up and down to calibrate the elevation in preparation for training. There may also be evident an element of difficulty in photographing this at all!

We hope this has been of interest - even to non- Enfield and B.S.A. pundits. Thank you for taking the trouble to read to this point!
See also the: WILKINSON SUB-TARGET MACHINE ...~.: S.M.L.E. SUB-TARGET DEVICE ..~: HOLLIFIELD "DOTTER" .~.. CUMMINGS "DOT" RIFLE ~... PRACTICE RODS
the British "Swift Training Rifle "and the Canadian "Long Branch Training Rifle" of 1943 vintage.
See this website's Raison d'être